MVVM Wizard
Quickly and easily create a new MVVM Component
This feature is available in MFractor Professional
Introduction
When working on Xamarin.Forms projects and applying the MVVM pattern, most of the time you will be creating a XAML Page or View alongside with it's View Model. This is normally a two step process where you need to create the Page/View and then a new class file for it's View Model.
Also, you'll probably need to setup the View Model that usually derives from a base class, and you may also wish to change the Page/View to derive from a different class the default templates.
Those are recurring time-consuming, error prone and boring tasks. Enters the MVVM Wizard.
This is a simple tool to allow you to quickly and easly create a new MVVM Component based on the standards and conventions you set once for the solution you're working on.
Info
A MVVM Component is considered the set of files that compose a Xamarin.Forms Page or View component with its corresponding View Model: the XAML file, its code-behind and the View Model class file.
Using the MVVM Wizard
The MVVM Wizard is presented as a dialog that can be invoked from MFractor Top Level Wizards menu:
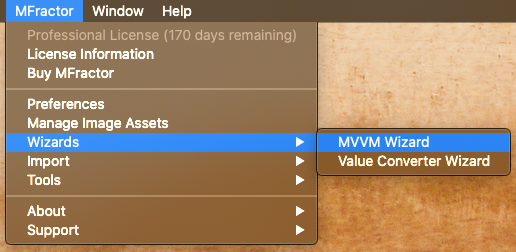
This option becomes visible when you're working on a solution with at least one Xamarin.Forms project. By selecting it the Wizard dialog will be presented.
Wizard Options
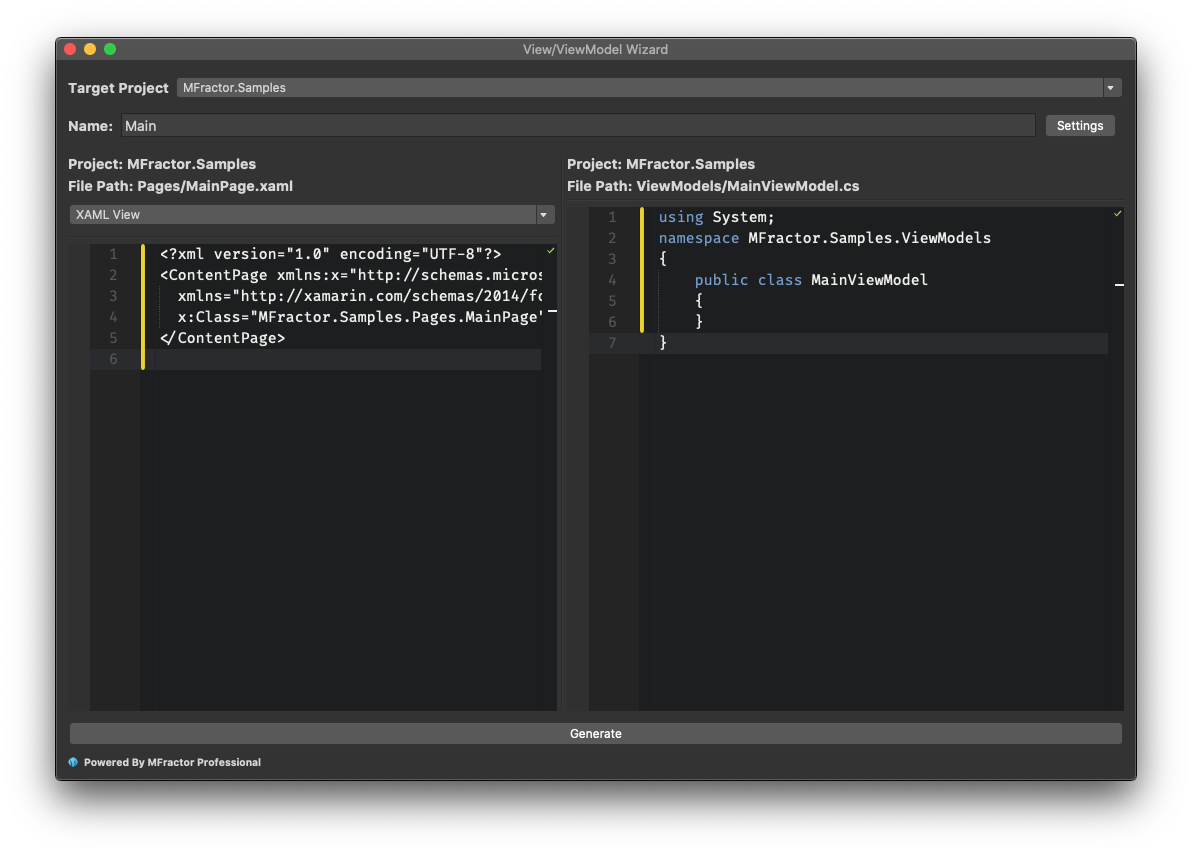
The Wizard is pretty simple and only asks you about two pieces of information:
Target Project
A drop-down allowing the selection of the project where the pieces of the MVVM Components will be created.
Name
The name of the MVVM Component you're going to create. You should provide the base name without any suffixes. They'll be added to the file/class names accordingly to the standard conventions:
- View files will append the
Pagesuffix - View Model files will append the
ViewModelsuffix.
You can change this behavior on the Wizard Settings.
Previewing the files
The MVVM Wizard allows you to preview the files that will be generated. In the middle section you'll find two panes:
- The left pane allows you to preview the files of the View, either the XAML and its code-behind file. You can switch between then using the drop-down.
- The right pane allows to preview the View Model file.
Note
Even though the preview panes allows for editing its contents, the changes won't be persisted on the generated code.
Wizard Settings
As we've seen in the previous section, the usage of the Wizard is very straightforward, as it is made to be quick and simple to use. By default it will use the most common conventions we've captured from the Xamarin community. Yet, the wizard is powerful enough to allow for further customization of those conventions.
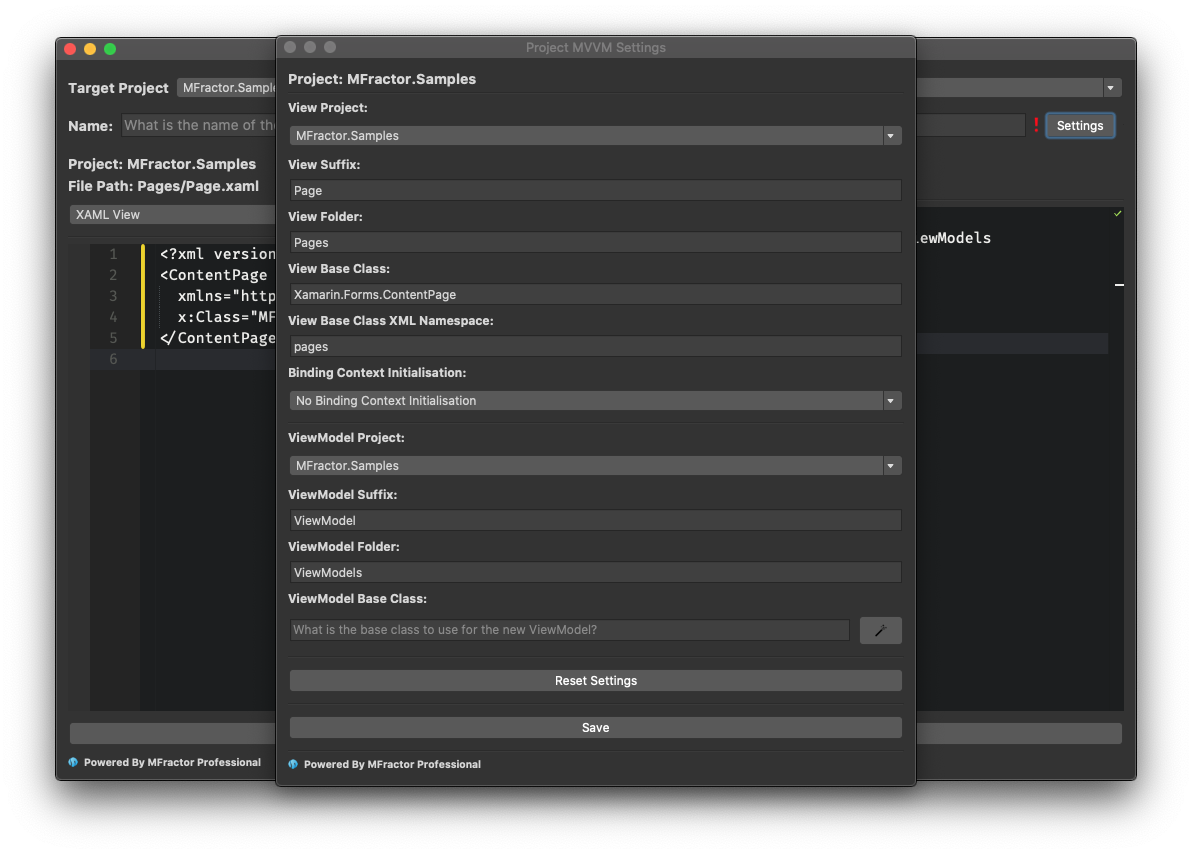
By clicking on the Settings button of the dialog by the right side of the Name field, you will be presented with the Project MVVM Settings, which allows will to customize every aspect of the wizard.
Wizard Settings Options
The Project MVVM Settings dialog allows configuring several aspects of the MVVM Component generation. This section provides an in-depth description of each of this options.
View Project
A drop-down field allowing you to select the project where the View (xaml and code-behind) part of the MVVM Component should be created. This allows fine-grained tuning on solutions where you may have separate projects for hosting View and View Model files.
View Suffix
Allows you to specify the suffix that will be added to the file name of the View. This affects the files and class names for that View.
Defaults to
Page
View Folder
Allows you to specify in which folder inside the View Project you want the View files (XAML and the code-behind) to be created. You may specify sub-folders by using slash separator /.
Defaults to
Pages
View Base Class and XML Namespace
This is a pair of related fields and allows you to specify the base class for the View component being created. Most Xamarin.Forms projects implements a custom base Page or View class for shared logic.
You should provide the FQN (Fully Qualified Name) of the type to be used as base class. This settings affects the behavior of the wizard in the following ways:
- In the XAML File: a XML namespace will be added to the root element to import the namespace where the class is declared. The root element will be changed to
<namespace:ClassName>to reference the base class in the XAML code. - In the Code-Behind File: the class will derive from the typed base class.
View Base Class defaults to
Xamarin.Forms.ContentPage
View Base Class XML Namespace defaults topages
Binding Context Initialisation
In the MVVM Pattern the BindingContext property of the View part is usually initialized with an instance of the View Model. This may be done in several ways, depending on the conventions or additional frameworks you may use for your project.
The MVVM Wizard can add initialization code to the new MVVM Component and you can choose the initialization strategy from 3 templates.
Info
The first two options for BindingContext initialization relies on the View Model class having a parameterless constructor.
If your implementation of the View Model relies on custom initialization, such as relying on dependency injection, you should avoid using those initializers.
Initialise BindingContext in Code-Behind
This option will append initialization code in the code-behind class of the View file, and affects the behavior of the MVVM Wizard in the following ways:
- Adds a public automatic property named
ViewModelof the type of the View Model class. This property resolves to casting theBindingContextproperty to the type of the View Model class. - Initializes the
BindingContextwith a new instance of the View Model class.
This code snippet examples the additions to the code-behind code:
using System;

namespace MFractor.Samples.Pages
{
    public partial class Page : Xamarin.Forms.ContentPage
    {
        public MFractor.Samples.ViewModels.ViewModel ViewModel => BindingContext as MFractor.Samples.ViewModels.ViewModel;
        public Page()
        {
            BindingContext = new MFractor.Samples.ViewModels.ViewModel();
            InitializeComponent();
        }
    }
}
Initialise BindingContext in XAML
This option will append initialization code in the XAML View file, and affects the behavior of the MVVM Wizard in the following ways:
- Adds a XML Namespace declaration named
viewModelsto reference the namespace of the View Model class file. - Adds a declaration of the View Model object to the
BindingContextproperty below the root View element.
This code snippet examples the additions to the View code:
<ContentPage
    xmlns:x="http://schemas.microsoft.com/winfx/2009/xaml"
    xmlns="http://xamarin.com/schemas/2014/forms"
    x:Class="MFractor.Samples.Pages.Page"
    xmlns:viewModels="clr-namespace:MFractor.Samples.ViewModels">
    <ContentPage.BindingContext>
        <viewModels:ViewModel x:Key="ViewModel"/>
    </ContentPage.BindingContext>
</ContentPage>
Register Withing Application.RegisterTypes
Prism is a framework for easing the development of XAML applications, and is becoming a popular choice for Xamarin.Forms apps. It can automatically binds the View Model with its View, which also allows for View Model navigation, one of the most popular features of the framework.
To take advantage of this feature you must register your Views and View Models at the application Startup. MFractor allows for automatically adding this registration for the new MVVM Component being created. When you select this binding initialization method the MVVM Wizard will add the registration of the View and View Model parts being created to the RegisterTypes method in the App class file.
This code snippet examples the code that is added to the files:
protected override void RegisterTypes(IContainerRegistry containerRegistry)
{
    //
    // Previous container registrations

    containerRegistry.RegisterForNavigation<Pages.HomePage, ViewModels.HomeViewModel>();
}
ViewModel Project
A drop-down field allowing you to select the project where the View Model part of the MVVM Component should be created. This allows fine-grained tuning on solutions where you may have separate projects for hosting View and View Model files.
ViewModel Suffix
Allows you to specify the suffix that will be added to the class name of the View Model.
Defaults to
ViewModel
ViewModel Folder
Allows you to specify in which folder inside the View Model Project you want the View Model file to be created. You may specify sub-folders by using slash separator /.
Defaults to
ViewModels
ViewModel Base Class
Allows you to specify the class to which the View Model class will derive when the MVVM Component is created. You should provide a .NET Fully Qualified Name of the type to be used as base class.
Setting a value for this field affects the wizard so it will add the using statement for the namespace of the class and add the inheritance declaration. If this field is left blank, MFractor will supress the declaration of a base class for the View Model.
Defaults to empty.
MFractor can aid you in finding the most likely View Model base class based on your project existing View Models. With this feature all the existing View Model classes will be inspected and the mostly used base class among the the files will be suggested as the base class setting.
To use this feature click on the wand button on the right side of the ViewModel Base Class field:

MFractor will consider a class as a View Model based on all the previous settings from this dialog. So for the defaults settings, it will scan the files the View Model Project, inside the View Model Folder whose the class names end with the View Model Suffix.
Reseting Settings
If you want to restore the settings for the default conventions, just click the Reset Settings buttons and they will be set to its defaults. You need to click the Save button to persist this changes.