Generate Custom Renderers
Quickly generate custom renderers for Xamarin.Forms visual elements
Introduction
MFractor allows you to quickly create the stubs for implementing a custom renderer for a Xamarin.Forms element using a Code Action that can be applied to your custom View Components. When invoked it will create the renderer class stubs in each of the selected projects including the proper export attributes.
Using the Code Action
Info
Check the C# Code Actions docs for details about how to invoke the Code Actions.
This Code Action can be applied to any type derived from Page, Layout, View or Cell types of the Xamarin.Forms package.
Suppose you want to create an enhanced button component that implements a platform specific feature of Android or iOS native button components. You can start by creating a new class that derives from Button, such as:
using System;
using Xamarin.Forms;

namespace MFractor.Samples.Views
{
    public class EnhancedButton : Button
    {
        public EnhancedButton()
        {
        }
    }
}
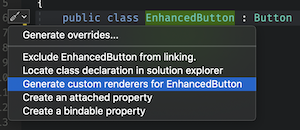
Place the cursor over the class name declaration and use the shortcuts to invoke the list of available Code Actions. The Generat custom renderers for EnhancedButton should be available to this list:
Invoking it will present the Generate Custom Renderers dialog:
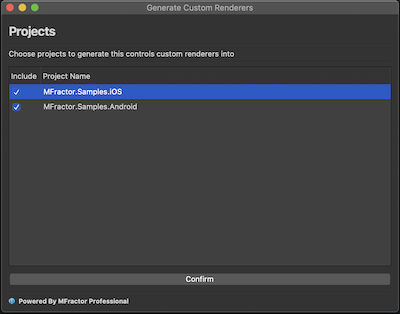
MFractor will identify the projects that has dependencies on the Xamarin.Forms project where the component is declared and add to this to allow selecting the ones to which you want to create the renderers. In the example above, there are an Android and an iOS project. When you confirm the selection the following files will be created:
Android Code Template
Defaults to Renderers/EnhancedButtonRenderer.cs.
using System.ComponentModel;
using Android.Content;
using MFractor.Samples.Droid.Renderers;
using MFractor.Samples.Views;
using Xamarin.Forms.Platform.Android;
using Xamarin.Forms;

[assembly: ExportRenderer (typeof(EnhancedButton), typeof(EnhancedButtonRenderer))]

namespace MFractor.Samples.Droid.Renderers
{
    public class EnhancedButtonRenderer : ButtonRenderer
    {
        public EnhancedButton EnhancedButton => Element as EnhancedButton;

        public EnhancedButtonRenderer(Context context) : base(context)
        {
        }

        protected override void OnElementChanged(ElementChangedEventArgs<Xamarin.Forms.Button> e)
        {
            base.OnElementChanged(e);
        }

        protected override void OnElementPropertyChanged(object sender, PropertyChangedEventArgs e)
        {
            base.OnElementPropertyChanged(sender, e);
        }
    }

}
iOS Code Template
Defaults to: Renderers/EnhancedButtonRenderer.cs
using System.ComponentModel;
using MFractor.Samples.iOS.Renderers;
using MFractor.Samples.Views;
using UIKit;
using Xamarin.Forms.Platform.iOS;
using Xamarin.Forms;

[assembly: ExportRenderer (typeof(EnhancedButton), typeof(EnhancedButtonRenderer))]

namespace MFractor.Samples.iOS.Renderers
{
    public class EnhancedButtonRenderer : ButtonRenderer
    {
        public EnhancedButton EnhancedButton => Element as EnhancedButton;

        protected override void OnElementChanged(ElementChangedEventArgs<Xamarin.Forms.Button> e)
        {
            base.OnElementChanged(e);
        }

        protected override void OnElementPropertyChanged(object sender, PropertyChangedEventArgs e)
        {
            base.OnElementPropertyChanged(sender, e);
        }
    }
}
This is the complete stubs for writing a renderer, including the ExportRenderer declaration. All you need to is implement the OnElementChanged and OnElementPropertyChanged custom logic and use your new component on your forms pages. Notice that MFractor will automatically resolve to the base class Renderer, so you don't need to bother about finding what is the correct native renderer to derive.
Tip
For more information about implement Custom Renderers for Views in Xamarin.Forms see the official docs.